Aha! Roadmaps | Individual capacity planning
There are two parts to good planning — clear definition of the work to be done and an understanding of available resources. With both, you are unlikely to miss launch dates, exceed budgets, or find yourself scrambling last minute.
Of course, complex cross-functional work will always involve an element of risk. But capacity planning is the key to mitigating that risk. With initial and detailed effort estimates, you can properly allocate your team. And with actual work logged, you can anticipate capacity problems before they grind your productivity to a halt.

In this article, we will focus on capacity planning and time tracking at the level of individual members of your team.
If you are an Enterprise+ customer, you can also visualize capacity across entire teams — including individual team members.
Note: Turning on capacity planning also enables the date range with a Start date and Due date that will be visible in all features and epics. You can visually manage feature dates and dependencies on the Releases → Gantt page.
Click any of the following links to skip ahead in this article:
Required permissions
Action | User permission level |
Configure capacity planning | |
Add estimates to records | |
Access the capacity report |
Enable capacity planning in your workspace
Navigate to Settings ⚙ ️ Workspace Capacity planning. You need to be a workspace owner to do this.
To further configure capacity planning in your workspace:
Estimation:
Choose to Estimate in time or Story points.
If you have chosen to Estimate in time, choose the Default time unit. If you enter a number in an estimate field, Aha! can interpret it as Minutes, Hours, Days, Weeks, or Months.
Time tracking:
Select Add as logged time if you want any remaining estimate to be logged as completed work when you move a record to a completed status.
Select Ignore remaining time if you want any remaining estimate to be ignored when you move a record to a completed status. This option ensures that the logged time accurately reflects work that was done.
Estimate association: Any record with child records — an epic with child features, for example — can have its Detailed estimates calculated from those child records. You can configure that roll-up association here.
Initiatives:
Initiatives can calculate their Detailed estimates from child records — Epics or Features — or you can enter detailed estimates for initiatives manually.
If an initiative does not have any child records, you will need to enter in a Detailed estimate at the initiative level.
Epics:
Epics can calculate their Detailed estimates from child Features, or you can enter detailed estimates for epics manually.
If an epic does not have any child records, you will need to enter in a Detailed estimate at the epic level.
Features:
Features can calculate their Detailed estimates from child Requirements, or you can enter detailed estimates for features manually.
If a feature does not have any child Requirements, you will need to enter in a Detailed estimate at the feature level.
Click Update configuration to save your changes.
Map capacity planning fields in an integration
Accurate effort estimates and progress updates keep your strategic roadmap accurate. If you have configured an integration between your Aha! account and an external development team, you can map capacity planning fields between the two tools for a bidirectional realtime sync.
To do this, open your integration configuration and move to the Mappings step. Then map these Aha! fields to the equivalent fields in your integrated tool.
Aha! capacity planning field | Aha! field name in integrations Mappings step |
Initial estimate | Cannot be mapped through integrations |
Detailed estimate | Detailed estimate |
Actual effort |
|
If you enable capacity planning and map these fields to an existing integration, you need to ensure that estimates start syncing correctly between existing records. To do this:
| |
1.0 integration 1.0 integrations are a legacy option. You cannot create a new 1.0 integration. | 1.0 integrations start syncing automatically as soon as they are enabled. To avoid sending estimates of "0" to your integrated tool:
|
Share capacity planning fields with Aha! Develop
If you have integrated your Aha! account with Aha! Develop, you do not need to map fields or monitor integration updates. Because both products work together in the same unified product develop environment, development teams in Aha! Develop see the same fields you do in Aha! Roadmaps — and can collaborate with you while following their own workflows.
Aha! Develop users can see all capacity planning fields:
The Initial estimate, often added by the product team.
The Detailed estimate, often added by the development team.
The Actual effort logged on the record.
Enterprise+ users can lock the Initial estimate field once the record has been shared with an Aha! Develop team.
Add estimates to Aha! records
You can record two different estimate fields on a record:
The Initial estimate, often added by the product team.
The Detailed estimate, often added by the development team.
In either case, you can choose to estimate in Hours or Story points.
You can add estimates to the following Aha! record types:
Initiatives
Epics
Features
Requirements
Any record with child records — an epic with child features, for example — can have its Detailed estimates calculated from those child records if you choose. As estimates change in those child records, you will have an accurate estimate of the total effort it will take to complete the larger body of work.
Visualize your team's capacity on the features board
Once you have enabled capacity planning in a workspace, you will see it reflected in two places on the Features Board.

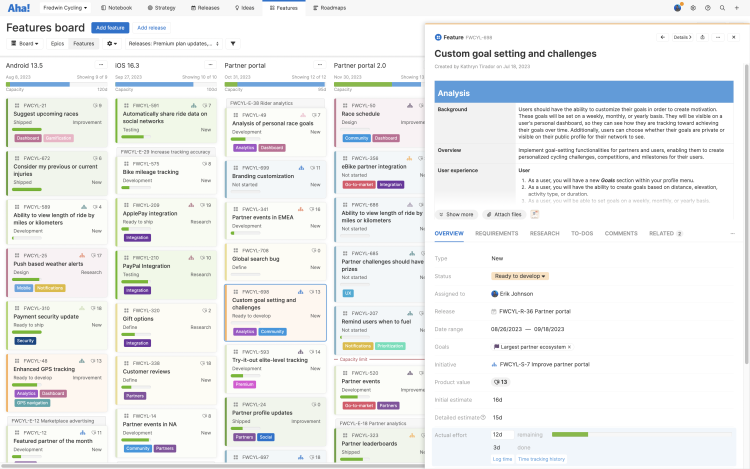
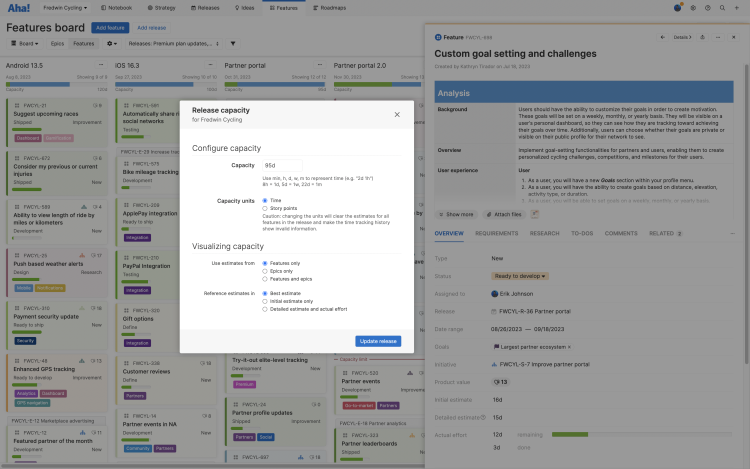
First, you will see Capacity bars at the top of every release on the board. Click it to set your total available capacity for a release (and if you do not yet know your total capacity, make an educated estimate and update it later when you have more information). The Capacity bar will display your total capacity based on your Detailed estimates, work completed and work remaining. If you are over your estimated capacity, part of the capacity bar will turn red.
Second, you will see a red Capacity limit line in each release. Any estimated records below the Capacity limit line are beyond your available capacity. You can decide whether to move them to a later release, drag other records of lower priority below the Capacity limit line, add more resources or people to your team, or extend the release date so you have enough time to complete the work.
Log actual effort
If you are confident that your Initial and Detailed estimates are accurate, you may choose not to log work against those estimates. But if your team is open to logging Actual effort, you will gain valuable insights and several additional benefits
You can compare Actual effort against your Detailed estimate to see how accurate your team estimates were (and therefore how confident you can be in your future capacity allocation).
You can add these progress updates to your roadmap — and confidently respond to inquiries about meeting your next release date.

You can log Actual effort manually in your Aha! account, or through an integration. To do this in your Aha! account:
Open the record where you want to log effort.
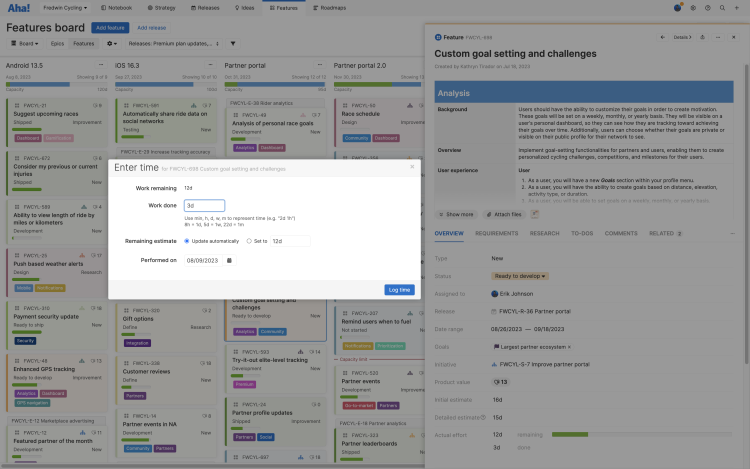
By the Actual effort field, click Log time or Log effort.
Enter the Work done. If you choose to, adjust the Remaining estimate and add a date the work was Performed on.
Click Log time to save your update.
If you want your logged Actual effort to adjust the Progress field on a record, set that record's Progress calculation to Calculate from remaining estimate. Roadmaps rely on the Progress field to visualize a record's progress.
If you accidentally log the wrong time and need to delete it, click Time tracking history next to the Actual effort field and clicking on the trash icon by the update you want to remove.
Use the capacity report
With capacity planning enabled, and your records populated with Start dates, Due dates and Estimates, you are ready to make use of the individuals capacity report by navigating to Roadmaps Capacity. The report uses the estimate type you select — Initial only, Detailed only, or Best (initial unless detailed is available) — and will show progress against those estimates as your team logs Actual effort.

The capacity report breaks down your team's capacity, by user, month, and record type, and shows you how many records are assigned to each user, which records are waiting to be assigned (or scheduled) and where any potential capacity conflicts might arise. If you configure it correctly, the capacity report is a wealth of insight that allows you to plan with confidence — and mitigate any problems well before your team experiences them.