Aha! Roadmaps | How to create a custom whiteboard template
Your Aha! account includes a large number of whiteboard templates for every stage of the product development lifecycle. From customer journey to sprint retrospectives, you never have to start with a blank page.
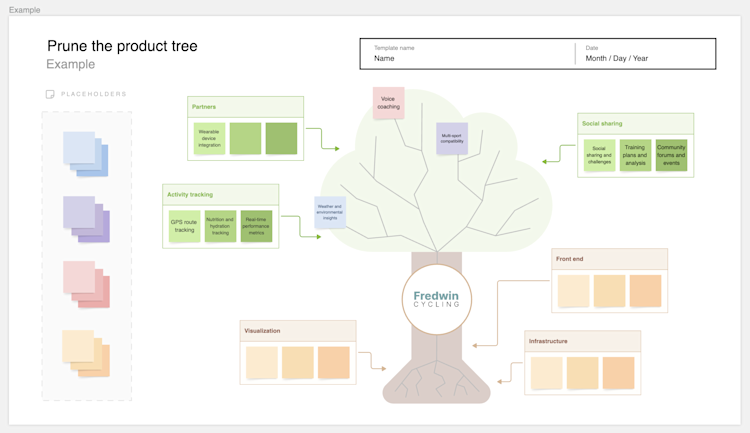
But pre-built templates cannot cover every use case. Your company might use industry-specific terminology when you create strategic models, or your team might work best with branded colors and a different workflow during brainstorming sessions. In this article, we will create a custom whiteboard template together, then add it to the template library so that everyone in our Aha! account can access it. Follow along and give it a try!
Do you have a large team? Our Aha! designers will help you create a custom whiteboard template at no cost. Reach out to our Customer Success team to get started.
Click on any of the following links to skip ahead:
Confirm user permissions
Action | User permissions |
Create a custom template | Aha! Roadmaps Owner or Aha! Notebooks add-on Contributor |
Create a new document from a template | Aha! Roadmaps Owner or Aha! Notebooks add-on Contributor |
Apply a template to an existing whiteboard | |
Collaborate on a whiteboard |
Identify the need
Before we start designing a new template, let's start with a goal. For this article, we will focus on a way to visualize all the features in a release. Our team has been playing some innovation games together to ensure that we are focusing on the most valuable features in our backlog, and we would like to move away from sticky notes so we can turn our findings into Aha! records immediately.
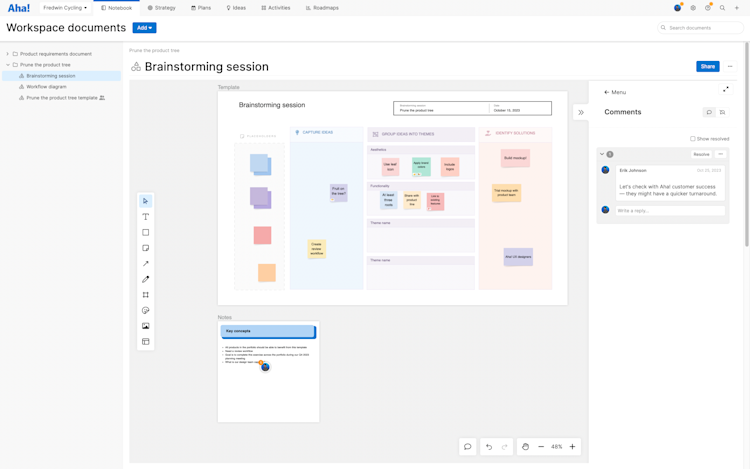
Our first task is to document what the whiteboard template needs to include. From a workspace in your Aha! account, navigate to Notebooks Documents.
Custom document templates created at the parent-line level can be used by any of the child workspaces. Navigate to Notebooks Documents at a parent line if you want multiple workspaces to have access to your template.
Click Add Use a template. We are going to use an existing template to help us gather design requirements for our custom template.
Select Brainstorming session.
Working with a team or by yourself, add a sticky for important design and functionality requirements. We want to be sure to consider:
Who at our company will use this template? Do we need to consider use cases beyond our own team?
How will this template benefit our company? We should prioritize designs that encourage these outcomes.
What are our company brand requirements? We might use branded colors or require certain terminology, and we can customize the template to match those requirements.
Vote on individual sticky notes, then drag them into Themes of requirements. In our case, it looks like we can group ideas into the themes of Brand, Use cases, and Business requirements.
In our company, custom templates need to go through an internal review process before they can be added to the template library. So off to the side of the Brainstorming session, let's document the review process.
Click Template from the whiteboard toolbar and select the Workflow diagram template.
Drag, edit, and adjust the workflow to fit your review process. In our case, we have three review cycles in a fairly straight line, as shown here. We have also added the expected turnaround time of each cycle, so we can estimate how soon we could expect to use our new template, if approved.
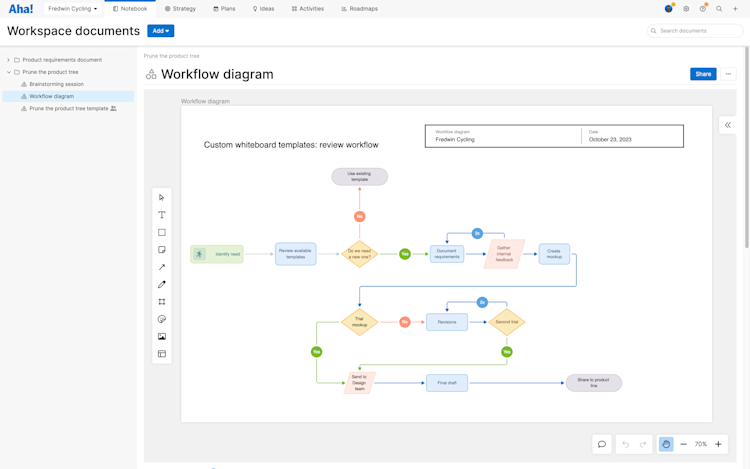
This is a great start. We are ready to incorporate this feedback in a design.
Create a mockup
Next, we will create a lightweight version of the template, so that we can experiment and adjust. Our team has recently been playing Prune the Product Tree as a way to gamify feature prioritization and visualize parts of our product that have disproportionate development focus.
For this game, we need to draw a tree to represent our product.
Branches on the tree represent our product's major areas of functionality.
Roots represent our product's supporting infrastructure.
Leaves represent potential new features, and our team adds them to the appropriate branch.
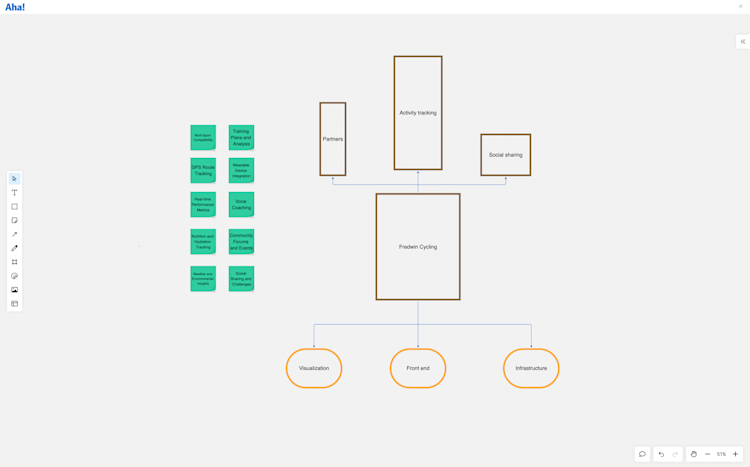
For a mockup of this innovation game, let's use basic workflow shapes and sticky notes. To do this from Notebooks Documents:
Click Add Whiteboard. This will create a blank whiteboard.
Create the tree's trunk. Click the Shape button (or use the shortcut
s) and select a rectangle. Drag it to the appropriate dimensions. If you like, color the outline a light brown.Create the branches. We can make these beautiful later; for now, create several more rectangles and place them above the tree trunk. If you like, change the height or width of the branches to represent the importance of each product area to your core product value.
Double-click on the trunk and each branch, and type to label them.
Connect the branches to the trunk. Click on the trunk, then click and drag a line to a branch. Repeat the process to each branch. If you need to move, rotate, or resize branches, they will remain connected to the trunk through these lines.
Repeat these steps to add roots to your tree. Make sure that the individual roots and branches are far enough from each other that there will be room for your team to add features to them.
Finally, use sticky notes for leaves, to represent individual features in our current release.
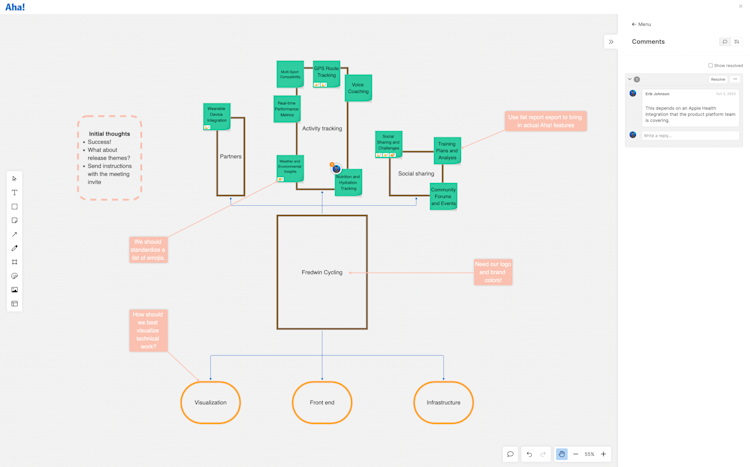
The result looks simple and functional. Perfect amount of effort for a workable mockup.
Try it out
We are ready for a trial. Let's invite the team.
Click the Share button in the upper right of the whiteboard.
Once everyone has arrived, we get to play the game!
Everyone should drag one leaf onto the appropriate branch or root.
Everyone should use emoji reactions to highlight the features they think are most valuable.
Anyone can add inline comments on any aspect of the whiteboard — either about the template or the features themselves.
After you have finished, discuss:
Are there major areas of functionality that the current release does not address?
Did this template work for this exercise?
How could we improve the template?
Document the feedback:
Create a text box from the whiteboard menu (or use the shortcut
t) and take notes on the discussion.Use the annotation shape to point to specific feedback.
This trial was a success! Now we need to make the template beautiful.
Refine the template
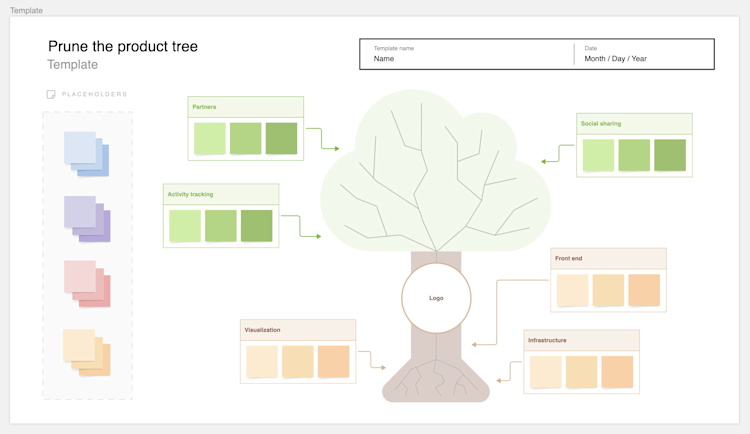
Time to address feedback. This is a good time to return to our initial goals for this template. If we were just looking to create a template that does not come standard with Aha! Notebooks for a single use, then the simple mockup might work. But for this article, we want something polished and branded that multiple teams can use across our Aha! account.
Here are some customizations that we can make ourselves:
Click on any shape to open the shape toolbar. From there, we can change the Border or Fill color and opacity. Click the + on any color picker to select or input custom brand colors.
Insert an image of an actual tree that we or our in-house designers created, or add the Leaf icon from the icon menu.
Apply brand colors or make other design changes in bulk. Say we wanted to color the "leaves" with a custom color. Changing each individual leaf would take too long. Instead, we can select every object in the whiteboard, then click the Filter button to adjust every sticky note or every item that is the wrong color green.
Add a text box with instructions. Consider making this a Frame. We could navigate to the instructions first, then with one click navigate to the exercise portion of the template.
Expand this whiteboard by adding in an existing Aha! Notebooks template, such as the 2x2 prioritization matrix. After the team has completed the product tree pruning, they can prioritize the same features across a matrix of two values.
There are additional customizations that are best suited to a professional designer. If you have a large team, our Aha! designers will help you create a custom whiteboard template at no cost. Reach out to our Customer Success team to get started!
Save the custom template
When everything looks perfect, we are ready to save this whiteboard as a template. To do this:
Click the More options button in the upper right corner of the whiteboard.
Click Save as template.
Name the template. We are going to add some identifying characteristics to the name, so that the right teams can find this later. Let's call our whiteboard "[2023] Fredwin Software PM teams: prune the product tree exercise."
Once we save the template, it will be visible in the workspace settings of every child workspace of our parent product line, at Settings ⚙️ Workspace Document templates.
Add a to-do to the template so that individual workspace owners can review it.
And that is it! Anyone with contributor user permissions in a relevant workspace can use our new template when creating new documents — and anyone can apply the template to an existing document. They can see it in the Custom tab of the template library.
If you get stuck, please reach out to our Customer Success team. Our team is made up entirely of product experts and responds fast.