Aha! Roadmaps | Best practices for managing cross-functional requests
Teamwork leads to better outcomes. Let's imagine, for example, that you manage a large portfolio of products. In order to achieve success, you need to work with IT, services, marketing, business, and other product teams so you can optimize every aspect of the customer experience and create lasting joy. You are working towards a common purpose, which means bringing together the right skills, knowledge, and experience from different parts of the organization.
The challenge usually comes from coordinating what needs to be delivered and when across teams. Of course, each team has its own goals, priorities, and deadlines. And each team has a different process for delivering work. It might not be clear how to request work from one another and communicate updates in a clear and timely way. Establishing guidelines for cross-team collaboration is vital so everyone can effectively work together and move the business forward.
There are many ways you can use Aha! Roadmaps to manage cross-team work. The Gantt chart is ideal for coordinating big cross-functional projects such as product releases, software rollouts, and marketing launches. You can track phases, milestones, and dependencies between work items in one view to keep the team on schedule. Creating to-dos is a useful way to assign smaller tasks across teams, such as reviewing or approving a work item.
But there are times when you need to build a more structured process for managing requests across teams. This is especially important for large organizations where teams span multiple business units and functions. In this scenario, we have two recommended solutions.
For Enterprise+ customers, work requests are the ideal solution. Work requests are a special type of to-do, designed with exactly this use case in mind.
For other Aha! Roadmaps customers, using a private ideas portal is perfect. You can capture requests in a central place, define a consistent workflow for managing them through to completion, and increase the transparency in your communications.
In this article, we will discuss both solutions. Please click any of the links below to skip ahead to your preferred method:
Work requests (Enterprise+)
If you are an Aha! Roadmaps customer with access to the Enterprise+ plan, you have access to advanced functionality like custom user permission roles and work requests. Both of these tools will be excellent solutions for you as you manage sophisticated cross-functional requests.
Big launches require a coordinated cross-functional effort. But it can be challenging to stay on top of the dependencies. Each group has its own goals, priorities, and deadlines, which means you spend a lot of time chasing down updates to ensure everyone delivers on time. That is why we created a better way to request work from other teams — so you can effectively collaborate to achieve exceptional outcomes.
Work requests give you visibility into sophisticated cross-functional dependencies. They are a special type of to-do that you assign to an entire workspace, not a single user. Accepting a work request requires users to create Aha! Roadmaps records — such as initiatives, epics, or features — to define and track the work. Once that work has been created, Aha! Roadmaps creates record links automatically between the work items you can visualize in many reports and roadmaps.
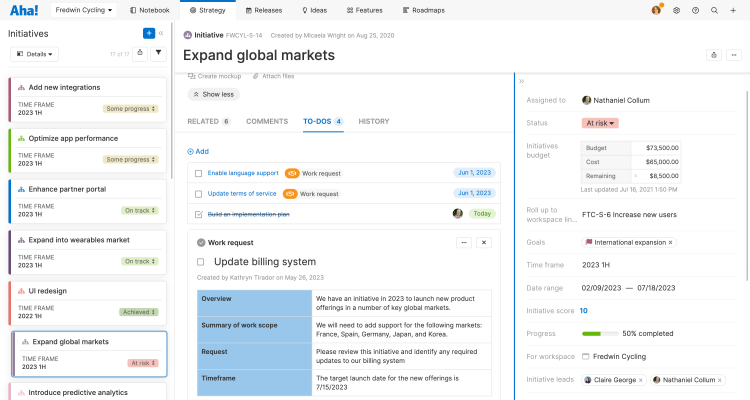
In this article, we will discuss how to use work requests to track cross-team work.
Click any of the following links to skip ahead:
Enable work requests
Work requests are disabled by default. To enable them, navigate to Settings ⚙️ Account Security and single sign-on Work requests. You will need to be an administrator with account permissions to do this.
Click the box to Enable work requests in your Aha! Roadmaps account.
Choose if you would like to enable Enhanced security. By default, any user in your account with owner or contributor user permissions can respond to a work request. If you want to limit this ability to a select subset of your users, you have two options:
Navigate to Settings ⚙️ Workspace Configure Work requests for a particular workspace. The users you add to this list will be the only ones able to respond to work requests for that workspace.
Create a custom user permissions role and select that option in the Enhanced security setting.
Click Update work requests configuration to enable work requests in your account.
Create a work request
You can create work requests anywhere that you can create regular to-dos, as long as the work request is attached to one of the following Aha! Roadmaps records:
Initiatives
Releases
Epics
Features
Requirements
Users with any permissions level can create work requests, but only owners, contributors, or (if you choose) members of a custom user permissions role can resolve work requests.
To create a work request, navigate to the To-dos tab on a record and click Add to-do. Select Work request from the to-do Type options.
Name your work request and add a Description. As a best practice, the description should clearly communicate the work you need done, the level of urgency, and any documentation or roadmaps that will help the assignees complete the work on time.
Select one or more workspaces in the Assigned to field.
Assign a Due date. This should be the date by which you want the work request reviewed, not the date you need the work completed.
Click Save.
Your work request will appear on the My work page of every user who has access to the assigned workspace(s) and has the necessary user permissions to resolve it.
Resolve work requests
So far we have discussed work requests from the creator's perspective. But work requests do not function like regular to-dos. Now let's talk about what happens when someone assigns a work request to your workspace.
If someone assigns a work request to a workspace you have owner or contributor access to, you will see any work requests in the To-dos section of your My work page. Use the Type dropdown to filter by Work requests if you want to see just this type of to-do.
Open a work request to resolve it. Other people in your workspace may have the appropriate user permissions, custom role, or workspace permissions to resolve the work request, so you may choose to use the Comments section of a work request to discuss the scope and urgency of the work.
There are two ways to resolve a work request:
Accept the request and add a record to represent the work.
Reject the request and add a comment explaining your rejection.
If you choose to Accept the work request, you will next create a new initiative, epic, or feature, depending on the scope of the work requested.
By default, the record you add will have the same name as the record where the work request initiated. You can customize the details of the record after you add it.
The record you add will be linked automatically as a dependency of the record where the work request initiated.
From here, the work request is resolved and the work itself begins.
Track dependencies
Work requests can involve multiple teams across multiple workspaces — so you need a quick way to visualize the progress of every record that contributes to the work request.
The Related tab on each record will show the Dependency record link. Click Visualize to see an interactive dependency map of the related records.
Use the dependency report to visualize related work in columns.
Use the strategy roadmap to visualize dependencies between goals, initiatives, releases, epics, and features. Note: You can visualize cross-team dependencies on the strategy roadmap, to highlight items that an initiative depends on that might not be visible on the roadmap.
Use the Gantt chart to visualize dependencies between releases, epics, and features.
You can visualize cross-team dependencies on the Gantt chart, to highlight items that a release or epic depends on that might not be visible on the roadmap.
To include key details about dependent work items, use the [Record type] record links table in any list, pivot, or chart report (or custom roadmap!). Then, add the Linked [record type] table and select any field (like Status, Assignee, or Due date) on the linked record's layout.
For a focused view of critical dependencies, filter these reports to show only records with Depends on/Dependency of relationships. You can also add information about manual and automatic risk indicators. Then, add your filtered report as a dashboard panel.
Any of these roadmaps will support cross-functional dependencies and each of them is highly customizable to fit your needs. This lets you see at a glance where you are on track — and where you are at risk.
Best practices
It takes skill to coordinate ambitious plans across multiple talented teams. You need to give everyone enough context to understand their part's strategic importance, and you need to be able to report on your progress instantly, so that everyone's effort pays off. As you start to use work requests in your Aha! Roadmaps account, keep these tips in mind:
Create a custom user permissions role. Unless you are comfortable with any owner or contributor in a workspace resolving your work request, you likely want to limit those permissions to a subset of users. As an Enterprise+ customer, you have access to custom user roles, the perfect tool to use in this case. Create a workspace-level custom user role with the ability to Respond to work requests, then navigate to Settings ⚙️ Account Users and add users to your custom role. You will need to be an administrator with billing permissions to do this.
You can bulk edit users to add them to a custom role.
The description matters. Your work request description is your best opportunity to share strategic context, define the scope of the work, and provide structure with deadlines, expectations, and priorities. Make sure your description communicates well. Do not forget that you can always link to other Aha! Roadmaps records — reports, notes, or roadmaps — that will help your audience.
Select the best roadmap for your use case. There are many ways to view the progress of work requests, as we covered in the last section. Select the one that best communicates to your team and customize it for your audience. Make sure everyone is familiar with the roadmap so you all have the same perspective on your work.
Consider dashboards. Almost all of the roadmaps covered in the last section — as well as several reports and charts — can be added to a custom dashboard. Dashboards can be shared internally and externally and are an excellent way to give your audience at-a-glance updates on your project.
Private ideas portal
If you are an Aha! Roadmaps customer on the Premium or Enterprise plan, then the private ideas portal is the best way to manage cross-functional requests.
Click any of the following links to skip ahead:
Introduction
Cross-team efforts are most successful when you have a shared way of working. Here are the most important rules to establish upfront:
Submit all requests through a private ideas portal so everything is captured in a single place
Add the ideas portal to every delivery team's workspace so requests can be routed appropriately
Choose a set of required fields for each request so information is captured in a consistent way
Define common terms for describing the status of requests so everyone can communicate and report on progress in the same way
Set service-level agreements (SLAs) for how long it will take to review and respond to a request so expectations are clear
The best practices outlined below will help you set organizational standards for managing cross-functional requests. We will first explain how to best configure an ideas portal. Then we will share how you can define workflows for the team that is requesting work and for the team that will deliver it. We know that every team is unique depending on what you manage or build and the other teams you work with. So for the purposes of this article, we will simply refer to the "request" team and the "delivery" team.
Configure an ideas portal
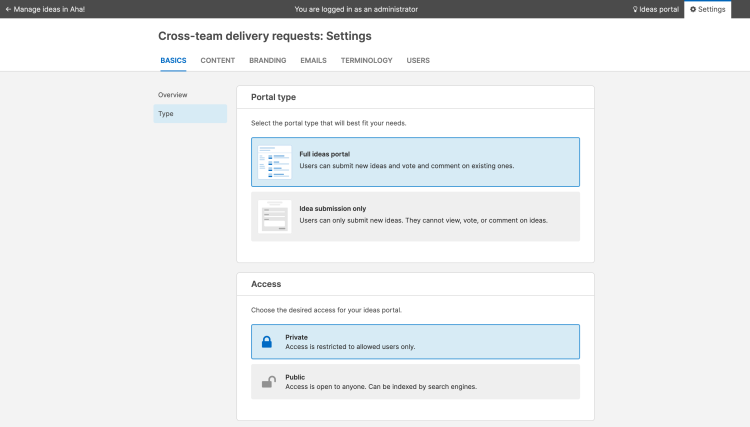
Create a new ideas portal and set the access level to private. In the Overview tab of your portal settings, add all of the workspaces used by your delivery teams. Including the same portal in multiple workspaces makes it possible for teams to submit requests in a central location and route them to the appropriate delivery team. Then add your company domain to the Users tab. Now only users with emails matching those domains will be able to access your portal. You might want to change the terminology in your ideas portal to reflect the language used by your organization. For example, you can change "idea" to "request."
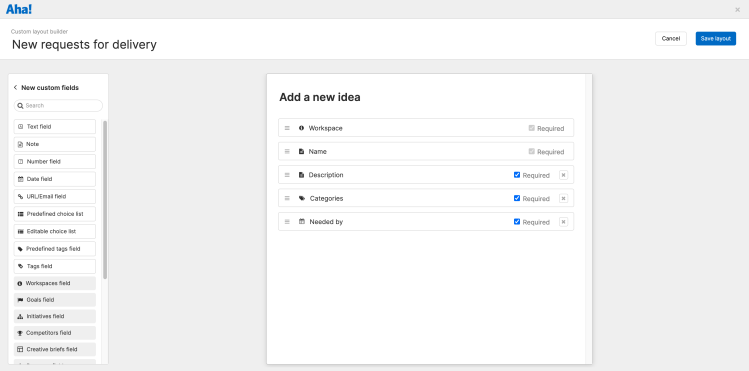
Customize the Ideas portal — Ideas layout to capture the information needed for each request. You can add custom fields, specify which fields are required, and rearrange the layout. Setting required fields ensures that new requests always include essential details — so delivery teams can efficiently review and prioritize requests. In the example below, we added a custom date field to capture when a request needs to be fulfilled.
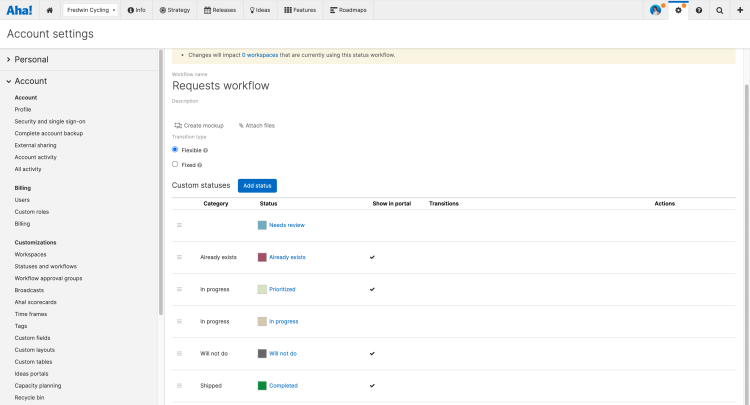
Create a custom workflow for managing requests based on your internal process. You can customize status names, colors, and transitions. Establishing a consistent workflow for managing requests across all teams helps everyone utilize the same approach and language. And you can quickly build reports to show the status of requests across multiple teams.
SLAs can help with setting clear expectations. If you set SLAs for how long it will take to review and respond to a request, we recommend including this information in the subtitle of your ideas portal. In the example below, we make it clear in the subtitle that the delivery team will respond to all new requests within one business day. You can also include this information in the notification email a user receives when they submit a request.
Once you have set up your private ideas portal for capturing requests, you will want to set standard workflows for request and delivery teams to follow. These workflows are vital for building a sustainable process so you can successfully track and manage cross-team dependencies.
Create a workflow for request teams
1. Submit a request through an ideas portal
When work is required from another group, a request should be submitted via a private ideas portal. The person submitting the request should complete all the required fields on the request form. The submitter will receive an email notification containing a link to the submitted request. This link is important to track progress and will be used in the step below. If a person or team needs to request work from multiple delivery teams, they should create an individual request for each team.
2. Create a feature to track requests
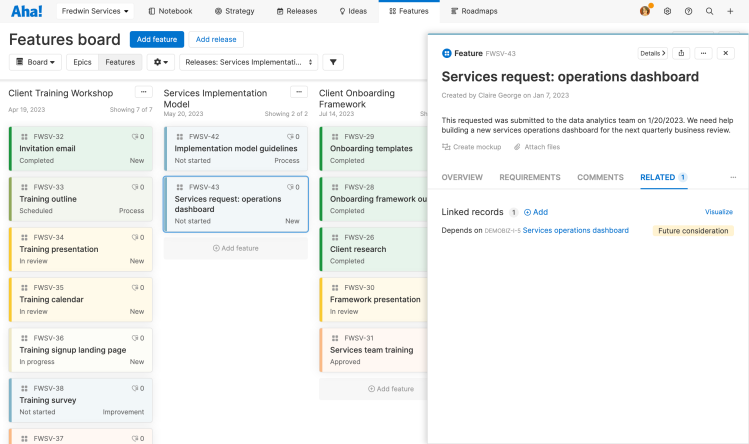
The person making a request should create a feature for each submitted idea to keep track of it on their own roadmap. In the Related tab, create a record link to the request as discussed in Step 1. We recommend setting the relationship type to Depends on. This will establish a link between the request and the feature. It is important for each request to have its own corresponding feature. You can create an epic if you need to group related features.
3. Respond quickly to questions
Delivery groups may require additional information to understand the scope of the request and prioritize the work. You can ask questions by commenting on the request, keeping relevant information together. The request team should respond quickly — ideally within one business day — to keep the request on track.
4. Monitor outstanding requests
The request team should monitor the status of each request and update the associated feature to reflect progress on their roadmap. Anyone on the team can proactively check the status of the idea using the record link in the Related tab. The person who submitted the request will also receive notifications of new comments or major changes to the idea status. In addition, it can be helpful to create a dependency report to quickly view the status of all work that the request team depends on to complete their own work.
Create a workflow for delivery teams
1. Review requests
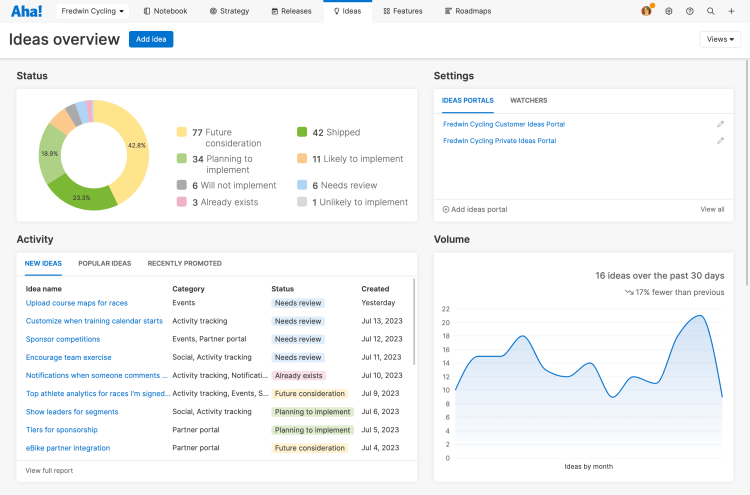
Delivery groups should review all incoming requests via the Ideas overview page. We recommend adding a comment to each request within the predetermined SLA time frame so the request team knows their request has been looked at. You can also use comments to gather additional information needed to prioritize and scope the work. Enterprise+ customers can use automation rules to create a review to-do whenever an idea is received, and change the to-do assignee based on the idea's category.
2. Prioritize requests
After the initial review, the delivery team should add a comment and update the status of the request to reflect plans for moving forward. This keeps the request team informed of what is happening. If the delivery team decides to prioritize the request, it should be promoted to an epic or feature so the work can be scheduled.
3. Communicate status updates
Collaboration is essential to drive alignment between the request team and the delivery team. The delivery team is responsible for updating the status of each request as progress is made on the work. Enterprise+ customers can use automation rules to link the status of epics or features to the request status, keeping the status of both records in sync.
4. Report on the status of requests
Delivery teams will want to keep track of requests that have been submitted. Creating a list report and sorting by the submitter is a great way to see everything in one place so you can manage what needs to be done and identify any issues. Review all requests often and add comments to inform the request team of progress.
Clear guidelines for requests will help your entire organization work effectively together. But it will take discipline and consistency for everyone to benefit. If your organization needs help getting started, contact us at support@aha.io. A member of our Customer Success team will respond fast.