To avoid redundant third-party notifications, changes to the text editor and mockups are delayed by at least five minutes, waiting for five minutes after the most recent change.
Aha! Roadmaps | Integrate with Rally
Successful products do not happen by accident. They are often the result of seamless collaboration between product and development teams. Developers need strategic context for their work. Product managers need progress updates to inform their roadmap.
But all too often, product managers have to use developer tools just to provide context and track updates — then manually update their own product plans elsewhere. They spend their days in multiple tools, trying to bring strategic vision and successful go-to-markets together.
The integration between Aha! Roadmaps and Rally keeps product and development teams in their tools of choice — without sacrificing context or collaboration. Two-way updates mean that strategic and progress updates flow back and forth in real time. And you can customize the integration to match your team's workflow and terminology.

In this article, we will walk through how to configure and customize an integration with Rally.
Click any of the following links to skip ahead:
Prerequisites
Integration type |
|
Aha! Roadmaps level |
|
Required user permissions: Configuration | |
Required user permissions: Use integration | |
Associated record types | Aha! Roadmaps
Rally
|
How to think about your integration
This support article refers to the 2.0 version of the Aha! Roadmaps Rally integration. For the 1.0 version, please reference this article.
Aha! Roadmaps provides a two-way integration with Rally that allows teams to send their planned work from Aha! Roadmaps to their development team working in Rally.
Before configuring any integration for the first time, it is important to fully understand how to think about integrating Aha! Roadmaps with your development tool. Aha! Roadmaps should come first in the process —build out or import your records in Aha! Roadmaps, then send them to Rally. You can customize the ways that fields map to each other between the two tools, and even customize whether you want integrated records to update automatically, or only after your review.
Configure your Rally integration
To set up an integration with Rally, you need to be a workspace owner in Aha! Roadmaps for the workspace you wish to integrate. You will also need to have a Rally account that has proper access to create/edit records in Rally for the project you plan to integrate with.
Navigate to Settings ⚙️ Workspace and press Integrations + on the left side navigation bar. Select Rally from the Integrations 2.0 grouping.
This will launch the integration configuration wizard. The first step is to name your integration and optionally select a template if you have already created one. Click Save and continue. Note: When you send records from an Aha! workspace to a Rally project, your Aha! account will send any linked records in other workspaces that share the same integration template — and those records will be linked in Rally as well. For example, you may have a feature in a workspace that is linked to a higher-level initiative in a in a different workspace. If both workspaces use the same Rally integration template, then sending the feature to Rally also creates the initiative in Rally as a record linked to the feature.
On the Configure Account screen, add the URL you use to access your Rally account. This setting cannot be changed once you start using the integration.
Next, you will be prompted to Authorize your account. Aha! Roadmaps uses OAuth 2.0 for authentication, and if you are already logged into an active Rally session in your browser, you will not be prompted for credentials. If you are not currently logged into Rally, you will be prompted with a Rally authentication screen.
After authenticating, you will be prompted to Choose a Workspace. The list of workspaces is based on what your Rally user has available to them.
After selecting a workspace, you will be prompted to Choose which Project in Rally you wish to integrate with. Similar to the workspace selection, the list presents the projects that you have access to within the previously selected workspace.
You also have the option to Exclude child updates.
By default, your integration will retain a link to an integrated record, even if you have integrated to a parent project in Rally and move a record to a child project that is not part of the integration.
If you Exclude child updates then moving a record from a parent to a child project will break the integration link.
If you Exclude child updates but have a few child projects you do not wish to exclude, use an integration template to create separate integrations with those projects. In that case, moving a record in Rally from a parent project to an integrated child project will retain the integration link.
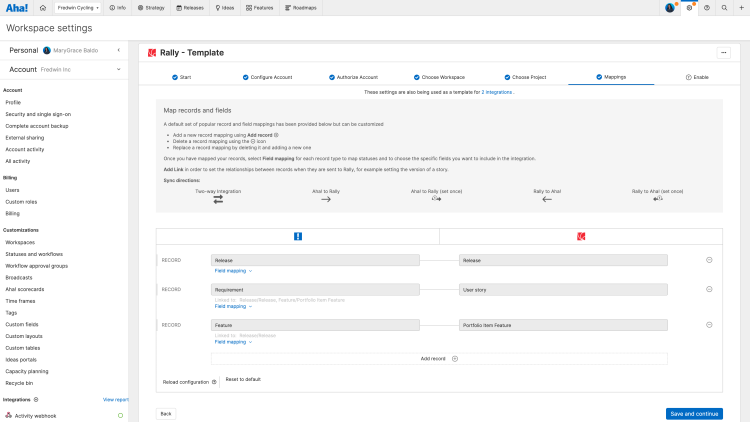
Next comes record Mappings. This step allows you to configure how Aha! Roadmaps records are mapped to your Rally records. The default mappings are based on what is most widely used by our customers. However, you are free to remove the default mappings and add your own to map records together based on what makes sense for your team and how you work.
![Customize your field mappings and set the direction of updates.]()
Within record mappings, you have the option to also specify your field mappings. This is an advanced option within the configuration that allows you to customize how each field within the record is mapped between Aha! Roadmaps and Rally — as well as what relationship links exist for those records. Note: If you have configured required fields in Rally, we recommend setting the Required flag on those fields in the custom layout associated with your Aha! Roadmaps workspace. This will ensure that any required fields are populated when records are created on the Aha! Roadmaps record creation form.
The relationship links are important to understand because they establish the ability for records created in your development system to be automatically imported into Aha! Roadmaps in certain use cases.
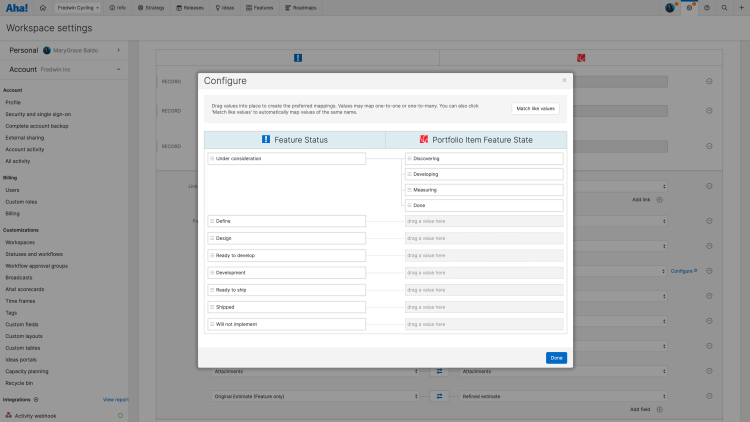
While not every user will need to customize their field mapping, you do need to define the way statuses are mapped. Within the field mapping section for each Aha! Roadmaps record, there is a line for Status with a ⚙️ icon at the far right. Click the ⚙️ icon to open up the status mapping window. Matching values are automatically mapped initially, and then you can manually rearrange statuses to your preferred mappings as needed. Values may map one-to-one or one-to-many.
![Configure statuses between Aha! and Rally]()
When mapping statuses, you will be presented with your Aha! Roadmaps status workflow for the record type on the left and your integrated system status workflow on the right. You can drag and drop the statuses to create groupings and mappings. In the above screenshot, you can see that multiple statuses have been grouped together where the Rally statuses of Measuring and Developing are mapped to the single Aha! Roadmaps status of In development.
With your records, optional field mappings, and statuses defined, you can click Save and continue to move onto the last step in the workflow. The Enable step allows you to specify how updates from Aha! Roadmaps are sent to your development system, and how you would like Aha! Roadmaps to import updates from your development system. The default settings are: Automatically send outgoing changes and Automatically import new records, which means that any change made to an integrated record will send to Rally automatically. We recommend the Approve outgoing changes and Automatically import new records settings for teams that are unfamiliar with how the integration works. The approval step allows teams that are new to the integration to validate what is being sent to and received from their development system, which can help prevent unintentional changes from traveling between the two systems. Note: If a feature's parent release is not linked with Aha! Roadmaps, or if releases are not mapped with the development system at all, then the feature will be imported into the first parking lot release. This is by design, since the parking lots are repositories for unscheduled work.
Add additional security
2.0 integrations have the option to include a client certificate for added integration security. This can also be called mutual TLS (mTLS).
To set a client certificate, open your integration settings and click the More options icon in the upper right, then click Set client certificate. From here, enter the private key and certificate — we recommend creating a private key and client certificate specifically for this purpose — and click Save to save your changes.
If you use an integration template to manage multiple integrations in the same workspace, set the client certificate in your integration template. That way, you only need to set the client certificate once.
This feature will only provide additional security when the server that Aha! Roadmaps is communicating with validates the certificate. This is usually only possible with customer-configured on-premises integrations. Client certificate authentication is in addition to the standard username and password/token authentication and is not a replacement.
Test your integration
Congratulations! You're ready to test your new integration. To do this, send a feature to Rally by following these steps:
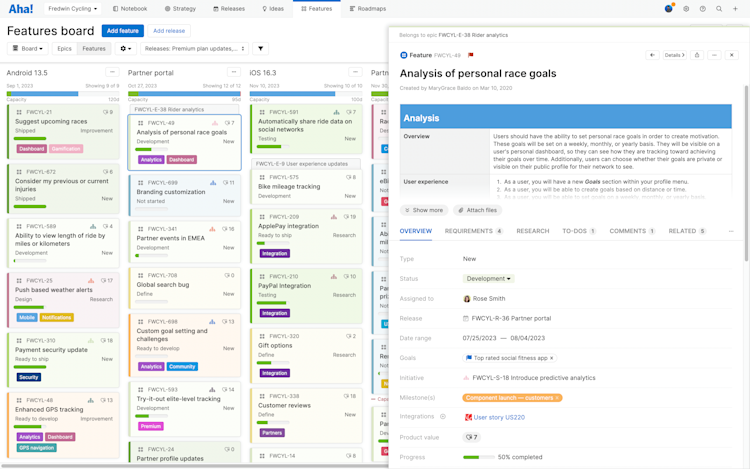
Navigate to Features Board.
Open one of your features in Aha! Roadmaps, then use the Integrations dropdown and select Send to Rally. You should see a link to the created Rally record appear on the Aha! Roadmaps feature after a few seconds. This will let you easily click into Rally to verify that everything was sent through correctly.
You can also bulk send a subset of features to Rally.
Manage your integration
If you have multiple Rally integrations that you need to manage, use the Manage integrations report, located in Settings ⚙️ Workspace Integrations.
If you run into difficulties with your Rally integration, you can find answers to common problems in the Rally section of the knowledge base.
If you get stuck, please reach out to our Customer Success team. Our team is made up entirely of product experts and responds fast.

