This article discusses functionality that is included in the Enterprise+ plan. Please contact us if you would like a live demo or would like to try using it in your account.
Aha! Roadmaps | How to visualize cross-team capabilities with custom tables (Enterprise+)
Custom tables are extremely flexible, highly useful tools to help you extend the Aha! data model and store information specific to your organization. Once you capture this key information you can then link it directly to your product data in your Aha! account. This helps you bring together these often dispersed data sets to make better decisions and share a more complete view of your strategy and roadmap.
This article was inspired by a live tutorial we recorded. Head there to hear Reilly O'Connor and Rose Smith walk through these steps!
In this article, we are going to work with a custom table that captures details about cross-team capabilities. We will link those capabilities to features in our account, then report on our team's capabilities in the context of planned work using a pivot table. Follow along and give it a try!
Click into any of the following links to skip ahead:
Confirm user permissions
Action | User permissions |
Create custom tables | |
Configure custom layouts | |
Add custom table to a workspace | |
Link custom tables to Aha! records | |
Create reports and roadmaps |
Create a custom table
First, let's create a custom table so that we can define our cross-team capabilities and link them to our planned work. You will need to be an administrator with customization permissions to do this.
Navigate to Settings ⚙️ Account Custom tables.
Click Create custom table.
While you could always start with an example custom table and modify it, we are going to create one from scratch. Click Create a custom table.
Name your custom table. We will name ours Cross-team capabilities.
Add an optional Description.
Create an API Key. You can use this if you need to update the custom table via the Aha! REST API. We will choose
crossteam_capabilities.Click Create to create a custom table.
Add custom fields to your custom table
Next, we need to build out the new custom table with custom fields. To do this:
Click Add custom field. We want to add the following custom fields:
Add a Text field called Capability name and give it an optional API Key.
Add a Note field called Description and give it an optional API Key.
Add a Users field called Owner and give it an optional API Key.
Add an Editable choice list field called Maturity level and give it an optional API Key. We added the following choices:
Conceptual
Deprecated
In development
Optimized
Stable
Testing
The custom table is up and running! Now we can add data to it, and start linking it to records in our Aha! account.
Add data to your custom table
We have created the custom table; now let's add data to it — and add it to a workspace. To do this:
In the workspace hierarchy, navigate to the workspace or workspace line where you want to add the custom table.
If you want multiple teams in your account to be able to link to your custom table records, consider adding your custom table at the product line or company level of your Aha! account first.
Now navigate back to your account settings. From the new Cross-team capabilities custom table in Settings ⚙️ Account Custom tables, click Edit records. This will add the custom table to the workspace you selected from the hierarchy dropdown, and open up the (currently empty) custom table.
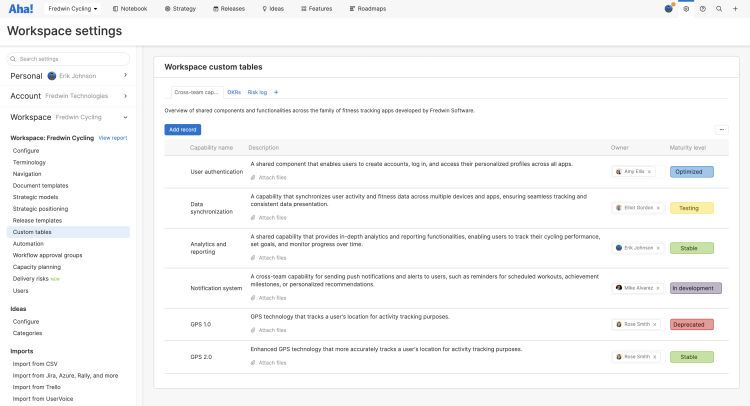
Click Add record to add your first custom table record. You can see the capabilities we added here.

You can add the same custom table to multiple workspaces from Settings ⚙️ Workspace Custom tables. This way multiple teams can use the same custom table structure, and even link to the same custom table records (depending how you define the custom table relationship fields in the next step).
Link your custom table to record layouts
Next, we need to create a link between our new custom table and the record type(s) that need to link to it. To do this, we will add a custom table relationship field to the custom fields layout for each of those record types. To start we will add a custom table relationship field to our features layout. We are going to choose a many to many relationship, but there are three types of relationships for custom tables:
One to many: One record relates to the entire custom table. These will display the whole custom table on the record itself as a tab, and allow you to edit the custom table from that record.
Many to one: Many records can relate to one piece of data from the custom table. This relationship will appear like a predefined-tag field on a record, but you will only be able to select one data point for the field.
Many to many: Many records can relate to many pieces of data from the custom table. This relationship will appear like a predefined-tag field on a record, but in this case you can add more than one data point.
To adjust a feature's custom layout, head to the features board. Navigate to Features Board.
Open a feature.
Click the More options button in the top right, and select Edit custom layout. This will open the layout builder.
Make sure you have selected the Feature view tab in the upper left. Then click Create custom field.
This is a list of all the different custom field types. Scroll to the bottom to see the custom table relationship fields, then drag a Many to many relationship field onto your features custom layout.
Adjust your custom field.
Name the field.
Select the new Custom table.
Select the Record visibility. When we create this custom table relationship field, we get to determine its scope. When users in our account reference this custom table, we can choose whether they can see every record in the table added across the Aha! account, or whether they should just see records added to the custom table from workspaces in their product line.
Click Create to create the custom field.
Adjust your custom layout.
Drag your custom field to the right spot in your custom layout.
Click into the More options menu to choose whether this field should Always show on a feature, or whether it should be hidden until someone needs it.
Click Save layout to save your custom layout.
Link cross-team capabilities to features
Let's take this for a spin and see how your team can use the custom table relationship field to link cross-team capabilities to planned work. To do this:
Navigate to Features Board.
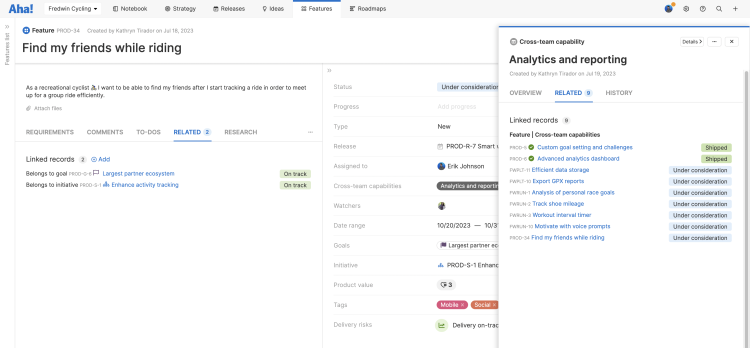
Open a feature and find the new custom table relationship field. We opened Find my friends while riding.
Click on the field to see a drop-down list of all available custom table records.
You can select one or multiple (remember, this is a many-to-many relationship field). We selected Social Sharing.
After you have linked a custom table record to your feature, you can click into that record — to see more information about the capability and (from the Related tab) to see every other Aha! record linked to that capability.

Report on cross-team capabilities
Finally, let's report on cross-team capabilities in the context of the features and workspaces that use them. A pivot table is the perfect vehicle for this visualization.

To do this, navigate to Roadmaps Pivot:
Click Create new report.
On the Select records step, we want to Create your own pivot report with Features Features with workspaces. Click Next to advance.
On the Add fields step, we will structure the pivot table.
In the Record hierarchy on the left, you should see Features and their Workspaces already.
Click Add records under Feature and select the Cross-team capabilities custom table to include our custom table.
In the Rows, click Add fields to add in our custom table record fields:
Capability name
Maturity level
Owner
Drag Workspace name from the Rows to the Columns section.
In the Cells, leave Feature name where it is.
Click Next to advance.
On the Add filters step, we want to see any capability that has not been Deprecated.
Click the radio buttons to start an Advanced filter.
Select All and filter for all Workspace names in your product line. In our case, that is Fredwin Cycling, Fredwin Platform, and Fredwin Running.
Click the More options button next to the Workspace name filter to Add subgroup.
Select None and filter for any Capability name that is blank.
Click the More options button next to the Workspace name filter to Add subgroup.
Select None and filter for any capability Maturity level that is Deprecated.
Click Save to create your pivot table.
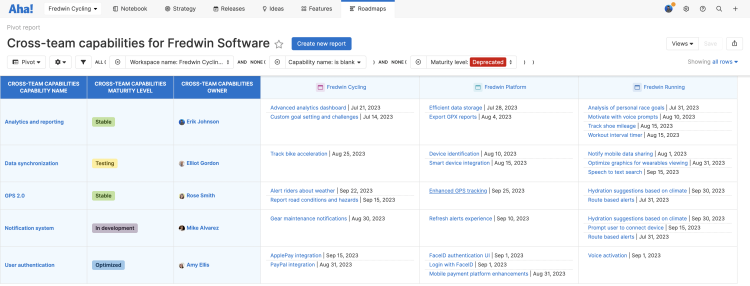
The report looks fantastic — I can see the capability maturity level, owner, and all work linked with that capability across every product in my product line. Let's add a little extra flair to make this pivot pop.
To do this, click ⚙️ Customize style at the top of the pivot.
Under Density, select Compact so that you can see all the valuable data without having to scroll.
Select an optional Theme to add some color to your report. We chose Blue.
Uncheck Show column headers.
Some feature and capability names can be long. Check Allow table cells to wrap.
Click Done to save your changes.
Congratulations! In one view we have combined custom data from our table with key product data from across our product line. This pivot table is an excellent opportunity for curiosity and conversation — and like all Aha! reports and roadmaps, you can click into any record in the pivot table to answer questions or adjust data.